Monday, 16 February 2015

Maya: T-Rex

16/02/2015

T-Rex (Organic Modelling)


For the past week I've been following a step by step guide in modelling a T-Rex from scratch. I've edited and textured a pre-made model in Mudbox and now it's time for me to create my own.

I opened a pre-made scene with the reference image and startup cubes in place.


I then followed the guide and started to model the head by adding edge loops, extruding edges and faces and moving vertices to match the reference. 


I also made sure I switched between side and perspective view to make sure that the whole model was to scale and in proportion. Modelling in just one viewport will make your model remain flat.

The guide and reference image helped me out a lot, but I spent a lot of time trying to perfect the model by tweaking each individual vertex to make sure it was in proportion and matched the reference.


Once I was done with the head I moved onto the body and tail. I selected the faces at the back of the head and extruded. I repeated the process several times and by adjusting the edge loops with the scale tool I followed and matched up the model to the reference image. 


I continued to switch between viewports to make sure the model was in proportion and matched the references. 


I also followed the guide carefully to make sure I had the right amount of edge loops and that they were all in the right place. 


Here is the final result.


Thanks to the guide I found this task easy and fun. I feel comfortable with Maya and I am getting to grips with the tools and techniques used. I just need to try and speed up my workflow and produce models faster. 


Visual arts: Lava monster

16/02/2015


Lava monster


For the past week I've been learning to use the inner and outer glow effects as well as other techniques to create a lighting effect in photoshop. The task was to try and create a Lava monster using these techniques to create realistic lava.


In class I tried two different techniques. The first technique was using bright colours such as yellow for the main body and using a red for an outer glow effect. I also added white highlights to help identify the hotspots within the lava. The 2nd technique was using the inner and outer glow effect tools within photoshop to simulate these effects automatically. The results made the images brighter and more appealing. 


I tested these new techniques on an image of a rock monster clay model image. I added a lava texture in the background to make it appear that the creature is emerging from the lava pool.


My homework was design and create a creature of my own. I started by creating a moodboard of all lava creature designs within games, films and comics. 


From there I created three roughs. I wanted to create more, but I had trouble coming up with unique and original ideas. I had two humanoid ideas, one based of Marvel's Ghost Rider and another emerging from a pool of lava. The third idea was of a dog with flames for fir and a charcoal skin texture. 


I decided to go for the humanoid approach and my final sketch design is a humanoid punching through the surface as if trying to escape from the earth's core. I felt this design is dramatic, expresses the environment from which the creature is from and overall an interesting image to look at. 

This design also gave me a chance to practice my foreshortening, which is a skill I need to develop. 


I scanned the image into photoshop and drew over the construction lines with a dark brush. I added basic colours and shading as well as inner and outer glow effects for the hottest areas in the image. 


I then added several volcanic rock and lava textures on the image to help add more depth and detail to the image. I went over the cracks on the texture image used for the creature using the inner and outer glow effects. I left the eyes un textured as they remain the brightest and the main focal point of the image. 

This is the final result.


This image still needs tweaking as some edges need tidying up a little. I feel my foreshortening in this image isn't bad, I struggled with the legs and leaving them out entirely makes the creature look slightly off. 

However despite these faults I do feel I have made an improvement and with more practice my artwork will improve. 


Monday, 2 February 2015

Pixel Art

02/02/2015

Pixel Art


Last week I was introduced to the world of pixel art. I was given a quick tutorial in class and was given the task of recreating a fire hydrant in photoshop.


I created circles by drawing squares and using the marquee tool selecting the "Stroke" tool under the "Edit" dropdown menu, selecting "inside" as the location and selecting ok to create a perfect circle. To create cylinders I just simply duplicated the circle, aligned them onto op each other and connected them with two straight lines. The pixellated look is done by using the pencil tool.


I created cylinders for the base and side nozzles and circles for each for the first and second level of the fire hydrant. When it came to shading I used the halfway to black technique and applied it to the colour red in the colour picker menu. I also used the references as a guide to make sure the colours and shading were as close as possible to a perfect match.


I had fun with this assignment and creating pixel art. I feel with more practice this will become a strong skill in my arsenal.  

Mudbox

02/02/2015

Mudbox


For the last couple of weeks I've been learning a new skill to add to my arsenal. I started to learn 3D sculpting using the Autodesk Mudbox software. In class we played around with the tools within Mudbox and was assigned the task of editing the default T-rex model loaded in Mudbox.


I first experimented with the model and tried to create bone and muscle structure the best I can. I first started with the head by using the sculpt tool to carve out the eye socket, the nose, mouth and eyebrows making sure I had mirror active on the x axis to my work would be duplicated on the other side. I used the smooth tool to iron out any extrusions and bumps on the model caused by the sculpt tool.


I then moved on to the feet by smoothing the edges of each toe and using the grab tool to pull them down to create narrow claws.


I then started to sculpt out muscle definition across the body starting from the head and finishing at the tail. I smoothed all sculpted areas to help round of edges and blend into the model.


I was using this image as reference throughout the sculpting process and now I was going to use it for painting the skin and final detail to my model. I did this by creating adding this image to the stencil library.  By using the projection tool and having my new stencil selected I simply painted onto my model. I was constantly resizing and rotating my stencil to match the model with quickly became very tricky and at time irritating to do. 


This was the final result and I wasn't satisfied. I felt that I was making sculpting far more difficult than it had to be especially regards painting.  


I decided to watch the Autodesk tutorials posted on myUCA to help get a better understanding of how mudbox worked and how each tool is used properly.

I created a new scene, imported the t-rex model and started modelling the head. I used the sculpt tool same as last time, but instead of switching between the sculpt and smooth tools I learnt from the tutorials to hold down shift while still using the sculpt tool to smooth objects. This made made productivity and time management so much easier and faster. I also learnt to use and control the brush sizes more efficiently to create the detail I wanted with quick and ease.


For the outline connecting the eye to the nose I used the wax tool. This made sculpting really easy as there was no ugly extrusions or bumps to iron out like the first attempt when using the sculpt tool. 


Still using the same image reference as before I continued to outline the major muscles on the body using the wax, bump and sculpt and smooth tools. 

When it came to painting I took a different approach. Instead on using the reference image for the detail I would get a small image of reptilian scales and an image of a T-Rex's eye to paint over.

I would use the reptilian skin image and paint over the entire body using the stencil and projection tools like before. I would then use the eye image and paint the eyes individually on.  This was a much easier approach as there was little adjusting or modifying the stencil images like before.


Here is the final result...


I still need to improve my anatomy and it will take some time and practice to create decent textured models within mudbox. I feel I have made a good start. I do need to study anatomy more in order to improve my organic models such as animals, humans and other organic creatures. 


Monday, 19 January 2015

Visual arts: Muscles

19/01/2015

Muscles

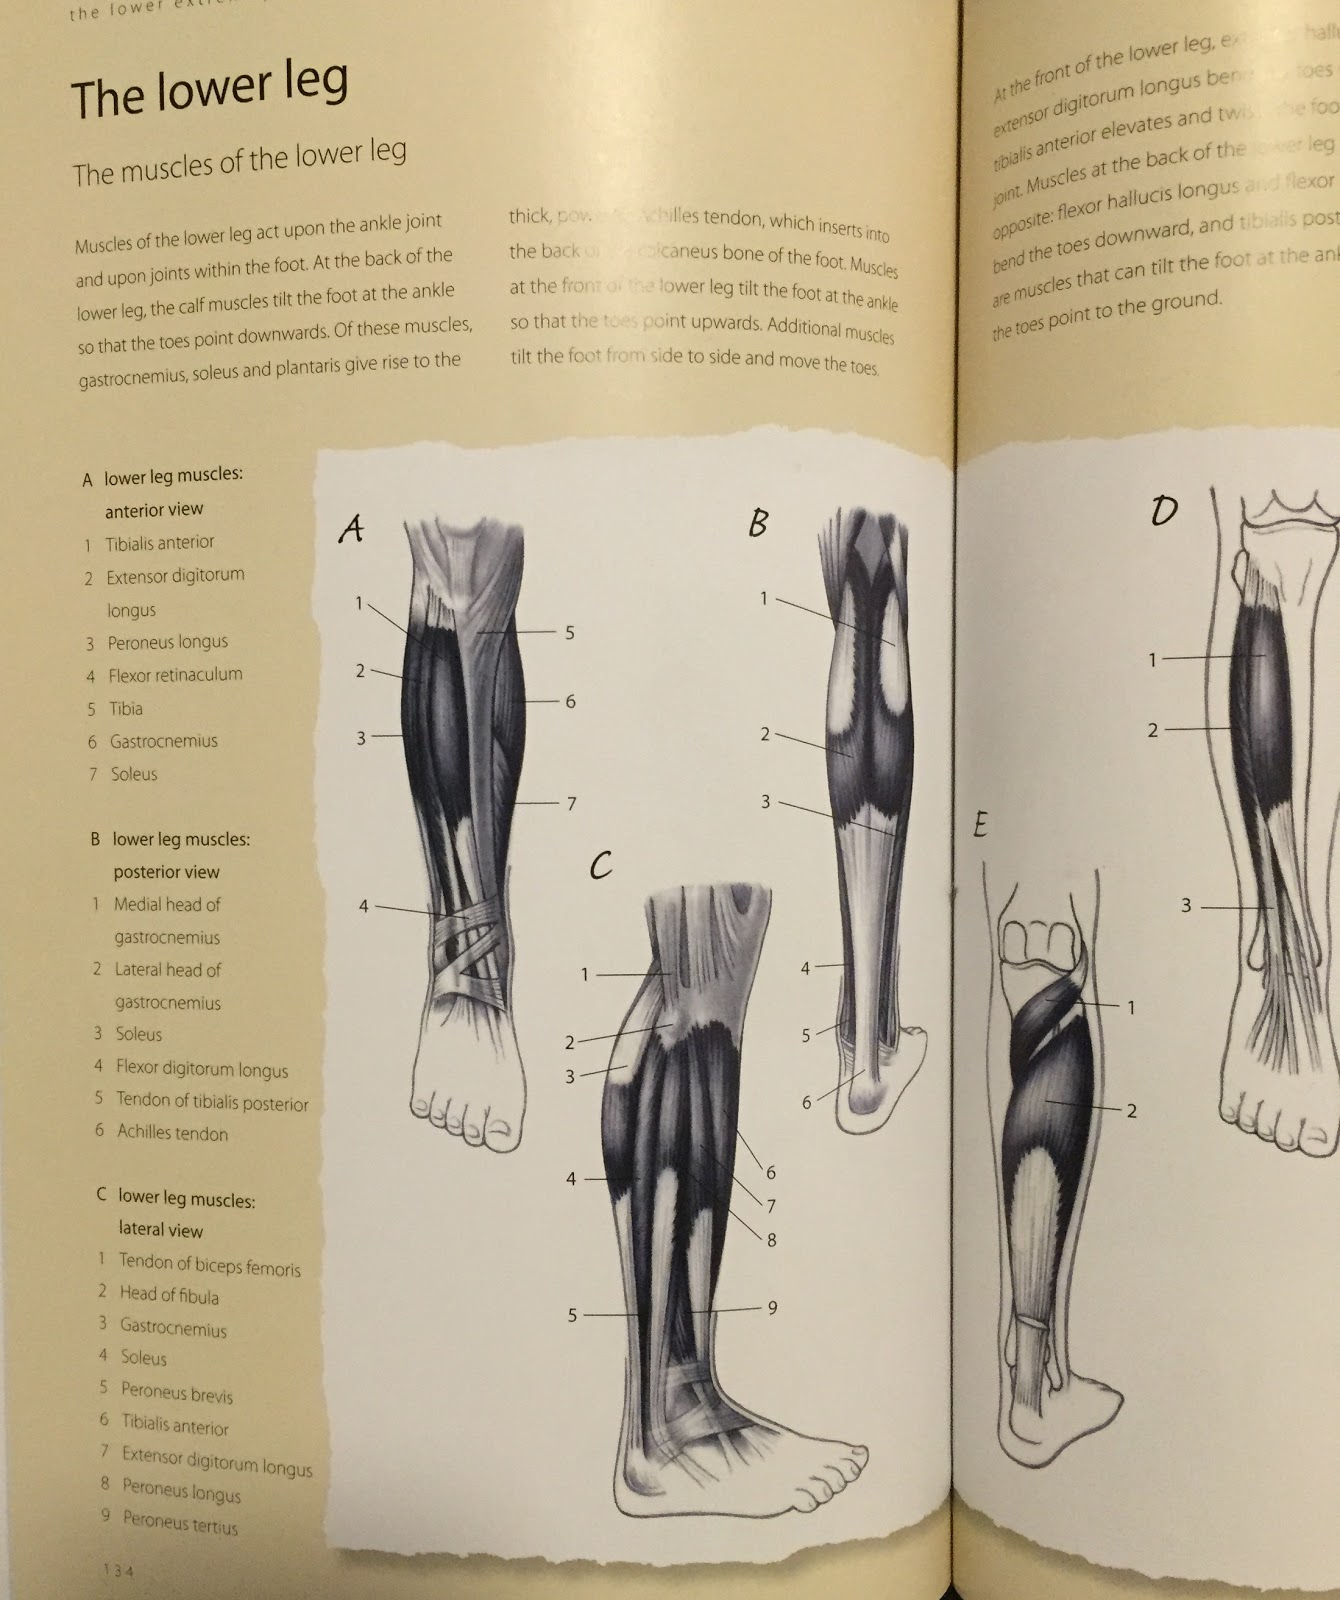
For the past couple of weeks I have been studying muscles of the human anatomy. Although this was an assignment set before me I feel this was a personal assignment long overdue for me to study.


I used "Anatomy for the Artists" as a visual guide to help me study and label correctly each muscle group. for the full back body pose however I used this image from Google.

images http://anatomypic.com/wp-content/uploads/2014/05/human-muscle-anatomy-diagram-10.jpg


Full Body


I found it difficult and sometimes irritating drawing the full body muscle group poses. This was due to trying to finely draw each muscle on a small figure drawing. My lines kept being too close together, which forced the muscles to be smaller and closer together than they should of been.


Head


 Neck


Shoulder


Arm


Back


My knowledge of the upper body and back have been improved and I'm already noticing improvement in my drawings. I often struggled drawing the arms, but now I have better knowledge of the major muscle groups and I'm able to reflect them in my work.


Thigh


Lower Leg


I still need to study more on the muscle groups of the lower body. I am struggling to create the same curvature created by the calf and hamstrings in the leg.  


Saturday, 10 January 2015

Maya : Star Trek USS Enterprise

10/01/2015

USS Enterprise Starship:


This week I was given the task in modelling the famous USS Enterprise from the popular TV and Film series Star Trek. Using the reference image as a guideline I divided the blueprint into each view point on a separate plane and positioned correctly to each viewport.


However I found out later on during my modelling that the images didn't line up correctly. This was either due to failing to match up the images correctly in each viewport, the reference image itself being uneven or even both.

Despite this I tried to correct each viewport as much as I could and made the necessary alterations where needed.

I started off with modelling the engine by creating a box and using the smooth key "3" I was able to model a smoothed object without effecting the polygon count or topology.  I added edge loops along the base and modelled to the reference image in the side and top viewports. For the satellite I simply extruded the edges several times and scaling them down and up.


However I felt something wasn't quite right especially with the satellite. I therefore reattempted the engine by creating a cylinder and using the same techniques as before I felt more confident and I felt I achieved a better result.


I then moved onto the cockpit which I started off by creating another cylinder. I then deleted the centre top and bottom faces and extruded the edges, moving them up/down and scaling them in. I then added edge loops and adjusted them to the reference image. 


It was tricky as the side and top viewport images did not match correctly. I found an much easier way of modelling by scaling in and out the edge loops rather than moving each individual vertex. Not only did this save me a lot of time, but it also helped make my model a lot more symmetrical, smoother and the topology overall better. 


I then moved onto the rockets which I created another cylinder and using the smooth key "3" I modelled to the images in the side and top viewports. I then added smooth to the rocket under mesh to smooth out the object by adding more edge loops. I duplicated the rocket and focusing on one deleting the edge loops to try and get a better poly count while at the same time keeping the same topology as the high poly model. 


Finally I added additional cubes and cylinders to connect the engine, cockpit and rockets together while still modelling to the reference.  I also added soften/harden edge to all objects to help even out any irregularities effecting my topology.  

Here is the result...


I've still got more editing to do such as the cockpit needs tweaking and the rockets need additional extrusions to fully match the reference. On the whole I am happy that I have learned new modelling techniques, but I am annoyed that I haven't corrected my viewport images. I will make sure in the future that my reference images fully align in each viewport before starting any modelling. This mistake has definitely cost me a lot of time, which easily could of been avoided. 


18/01/2015

I re-looked at the model and decided to make a few tweeks to the cockpit by deleting edge loops and re-extruding them. Using the scale tool I rescaled the edge loops to match the reference a lot better than before. 


Now that I was happy with the cockpit I turned my attention to the shuttle craft deck. I decided to delete some of the rear faces and extruded out the edge loops. 

I couldn't get a good look of the shuttle deck due to having no rear view perspective reference, so after searching online I found out that the shuttle deck could be made with a sphere. I simply created and resized a sphere to fit in the gap I've just created. 


I then added extrusions to the rockets and at the front of the engine for the final touches to the model. Here is the final model.