Showing posts with label Maya. Show all posts
Showing posts with label Maya. Show all posts
Monday, 18 April 2016
Hufflepuff Common Room: Unity
I imported my scene into Unity and came across a few issues. I noticed the scale was off and needed to be adjusted back in Maya. Once the adjustments were made I re-imported the scene. The second issue I came across was the amount of materials imported. I ended up deleting all materials from the project and created them from scratch instead. This helped me manage my project better. As I was importing my texture maps into Unity I noticed a third issue. Because some of the objects had multiple textures attached it would be hard to add them in Unity. I therefore had to separate and extract objects back in Maya such as the walls, floors and doors and reimport them. By having them as separate objects it made it quick and easy to apply the texture maps correctly.
I used the sun shaft and bloom camera effects to create god rays in my scene. This also helped create a warm glow which was vital for the scene.
Wednesday, 6 April 2016
Hufflepuff Common Room: Continuously Tweaking
I've continued using Quixel to texture my models. However I've continued to face issues with my UV's while doing so. For example my doors, windows, chairs and flower pots all had wasted space within their UV's. Not only that, but my floor and wall textures also had issues. The textures were not seamless to begin with and there was stretching of UV's around the entrance.
All of these issues had to be fixed. This required a lot of back and forth between softwares in order to deliver models to a respectable standard. Although tedious it was necessary. The UV's for my walls and floors needed to be evened out using the scaling tool in the UV editor. This helped smooth out the UV's and fixed most issues. However extra edge loops needed to be added around the entrance to mend some of the more tricky stretched textures.
I also needed to attach my windows to the walls. This is because I needed light to shine through them using the skybox in unity. I extruded out the faces of the window. I then merged the edges to four points to form a single polygon. Once I merged the wall and windows together I then connected the verts together and the windows where finally attached. Then I could delete the inner faces and have light shine through them.
Wednesday, 23 March 2016
Hufflepuff Common Room: UV Unwrap and textures
UV Unwrap and Textures
I finished UV unwarpping all objects within this project. I used a variety of techniques and tools to do this. The most popular technique I used was cutting and sewing UV edges and unfolding the UV's using the unfold tool. I then used the scale tool to straighten out the edges in the UV editor window.
However for some of the objects such as the wooden chairs this technique wasn't the best. I therefore needed to use the automatic unwrap on certain faces and sew UVs together in order to create cleaner unwraps.


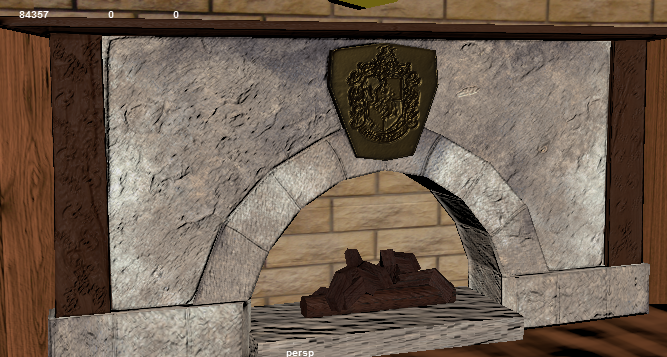
After unwrapping my fireplace I baked the normals from my zbrush model to my low poly model. I then created a colour map. I now had 3 separate maps, which I loaded into quixel to add the final textures.


I'm continuing to add textures to the rest of the environment.

Thursday, 18 February 2016
Maya: Hufflepuff Common Room Greybox
18/02/2016
I have greyboxed my Hufflepuff common room environment in Maya. After looking closely at my references I recreated the room while keeping true to the source material.


I added a smaller cylinder for the barrel which the students crawl through in order to enter the room.

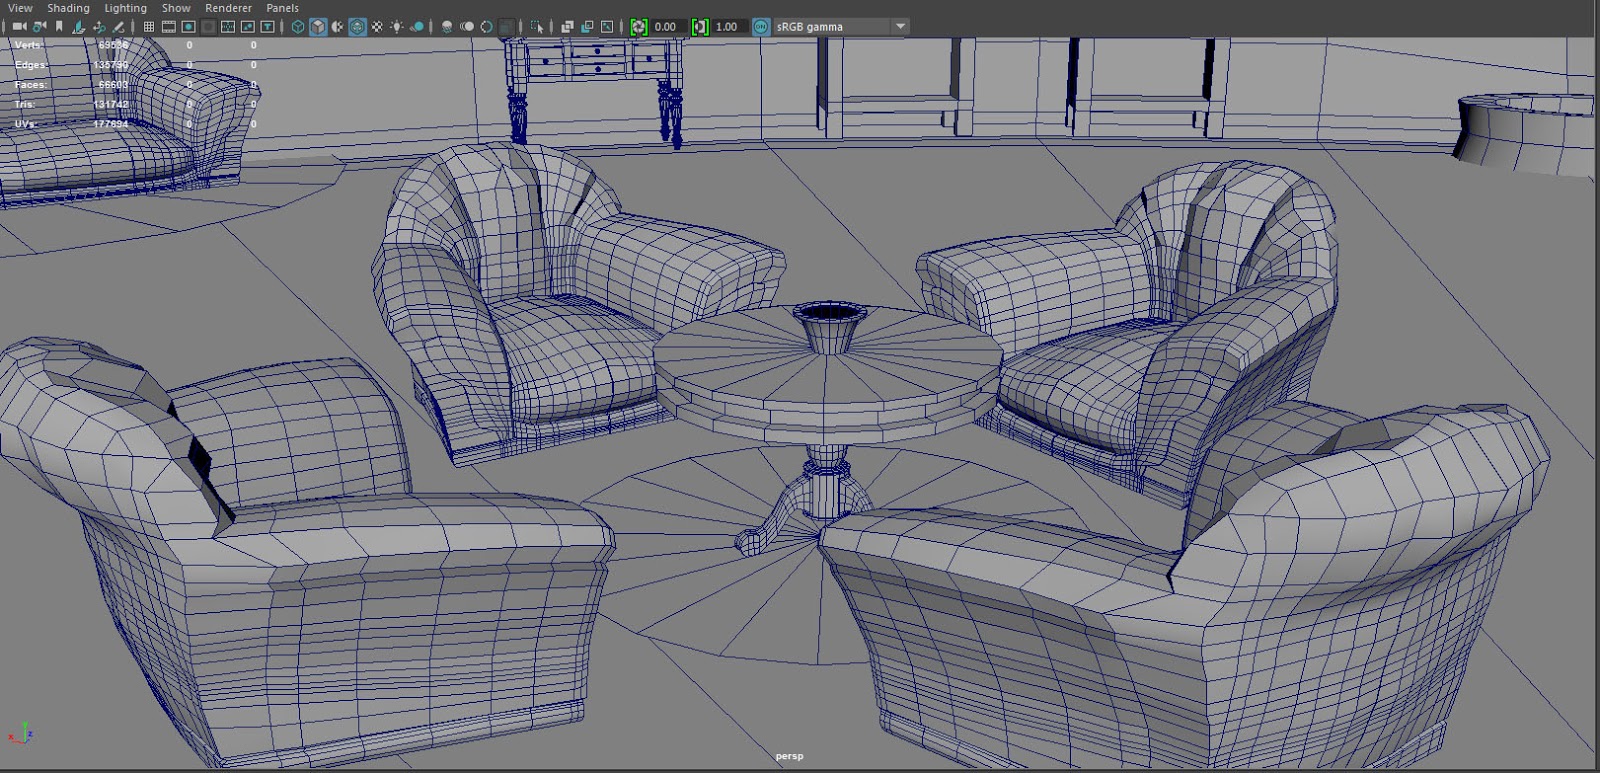
I modeled many objects in separate maya scenes and imported them into the main common room scene here. I created two types of chairs. I created wooden chairs and armchairs. The armchair was tricky as I needed to model it to appear overstuffed and cozy. Once I was happy with the models I imported them into the scene and duplicated.


For the sofa I split the armchair in half and stretched the model. I then duplicated and sewed the two models together to create a whole sofa.


For the hanging plant pots I used a cylinder and deleted the topfaces. I extruded down and scaled in to create a narrow point. I used a similar technique for the tabletop plant pots I used stretched cubes for the hanging chains.

I have greyboxed my Hufflepuff common room environment in Maya. After looking closely at my references I recreated the room while keeping true to the source material.


I modeled the room using a cylinder and separating the top faces for the roof. I Then attached a cylinder to the side of the room to create the archway/ entrance to the room.

I added a smaller cylinder for the barrel which the students crawl through in order to enter the room.

I modeled many objects in separate maya scenes and imported them into the main common room scene here. I created two types of chairs. I created wooden chairs and armchairs. The armchair was tricky as I needed to model it to appear overstuffed and cozy. Once I was happy with the models I imported them into the scene and duplicated.

I modeled the table from a cylinder and extruded several times. I also retopologised the faces so they are all quads.
I modeled the bookshelves and the notice board from simple cubes and extruded.

For the sofa I split the armchair in half and stretched the model. I then duplicated and sewed the two models together to create a whole sofa.

For the doors I used the a cylinder and extruded outwards to create the doorframe. I then extruded from the center to create the doorknob. I duplicated and deleted the doorknob and merged the verts to the center to create the windows.

I created the fireplace from a cube and used a cylinder and extruded to create the portrait frame.

For the hanging plant pots I used a cylinder and deleted the topfaces. I extruded down and scaled in to create a narrow point. I used a similar technique for the tabletop plant pots I used stretched cubes for the hanging chains.

Monday, 25 January 2016
Maya: Head Modelling
Head Modelling
In class we learned how to create a human head in Maya with correct topology. Using the tutorial and reference images as a guide I created the model step by step.
I first started by modelling the eye. I did this by creating a cylinder and deleting all the faces except for the front. I then shaped the remaining faces to match the eye.

I then followed the same steps and created the mouth. I then extruded out from the edges of both the eye and the mouth and then deleting the inner faces.

From there I extruded from the faces and slowly modeled the rest of the face. I focused on one coloured area at a time making sure I matched the topology in the reference.

Once I was happy with the face I carried on modelling the rest of the head.

Here is the final model.

This model isn't perfect as there are too many creases especially around the neck. I will have to keep repeating the tutorial if I want to learn to correct the errors I've made here.
Wednesday, 9 December 2015
Game arts: Winter Submission part 3
09/12/2015
Zbrush, Texturing, Xnormals & Unreal
I started to add detail in zbrush to my model. I first subdivided the model 5 times in order to generate more polys. The higher the polys the more room for smoother texturing.


I then added Stitching to my model using the StichBasic brush Tool.


Once I added all the detail I then exported the model ready to bake.
I opened xnormals and loaded the low and high poly models to the xnormals.


I then adjusted the settings and baked.


I then added the normals to the low poly model in maya. I had to adjust the bump depth in order to make sure they weren't too strong.

I then created my colour textures in photoshop.

I added the colour texture to the same material as my bump maps.


Once I was satisfied with my final model. I then exported the model and textures into Unreal4.
I also created a quick comic book to add to the environment in order to make my environment look more interesting.

After tweaking with the lighting and adding some cubes I've created my final Unreal scene


Friday, 23 October 2015
Game Art: Winter Submission Part 2
23/10/2015
Bag Prop High Poly (Maya)


Bag Prop High Poly (Maya)
I continued where I left off by creating a cube and rescaling it into a belt. I then duplicated the object to create two belts. Using the measurements I gathered for my research I adjusted the belts to their correct length.

I then used the bend tool to add curvature to the belts. I then added belt buckles and adjusted the verts to show the belt is woven between them.

I then moved onto the zip. I used the quad draw tool to outline the handle. Adding edgeloops and adjusting the verts I deleted faces to create the holes. I then extruded the edges down to add depth to the holes. I also extruded the first top faces around the edge of the handle to add more depth to the zip. I then mirrored and attached the bottom of the handle.

For the zip base I created a cube and scaled the edges to match the image. I then selected and deleted faces when needed. I looked at my actual bag for reference. I then extruded the centre top faces to create the hook.

I scaled down the zip and adding extrusions to the top of the bag I lined up the zip accordingly. After some tweaks to the model here is my final high poly maya model ready for UV unwrapping.


Thursday, 15 October 2015
Game Art: Winter Submission part 1
15/10/2015
Bag Prop
For my winter submission in game art I decided to model my Spider-Man bag, as I always carry it around with me, so I'll always have good reference.


Bag Prop
For my winter submission in game art I decided to model my Spider-Man bag, as I always carry it around with me, so I'll always have good reference.

I started off by taking photos of my bag from different angles to for reference. I also too measurements of my bag to help understand the proportions better. I then identified each material and colour on my bag and googled referenced them.

I took my photo references and I lined them up in photoshop in order for the proportions to be correct and ready to import into maya.


I opened maya and set up my scene. I then started modelling the front of the bag using the quad draw tool.


I then continued to model the side and back of the bag.

Here it is in smooth mode.


Subscribe to:
Posts (Atom)